Authentication
The UPowr API supports two OAuth 2.0-based client authentication mechanisms designed for machine-to-machine use cases:
-
Client Secret: A straightforward and widely used authentication mechanism wherein a client authenticates using credentials that include a pre-shared secret.
-
Private Key: Offering an added layer of security, this authentication mechanism utilises public key cryptography with JWT assertions to authenticate a client.
Client Secret
This symmetric authentication method is included in the OAuth 2.0 specification. The pre-shared client secret is a high-entropy value generated when your client is registered with UPowr. Your application exchanges its client credentials, including this secret, for an access token that is used to authenticate itself in requests to the UPowr API.
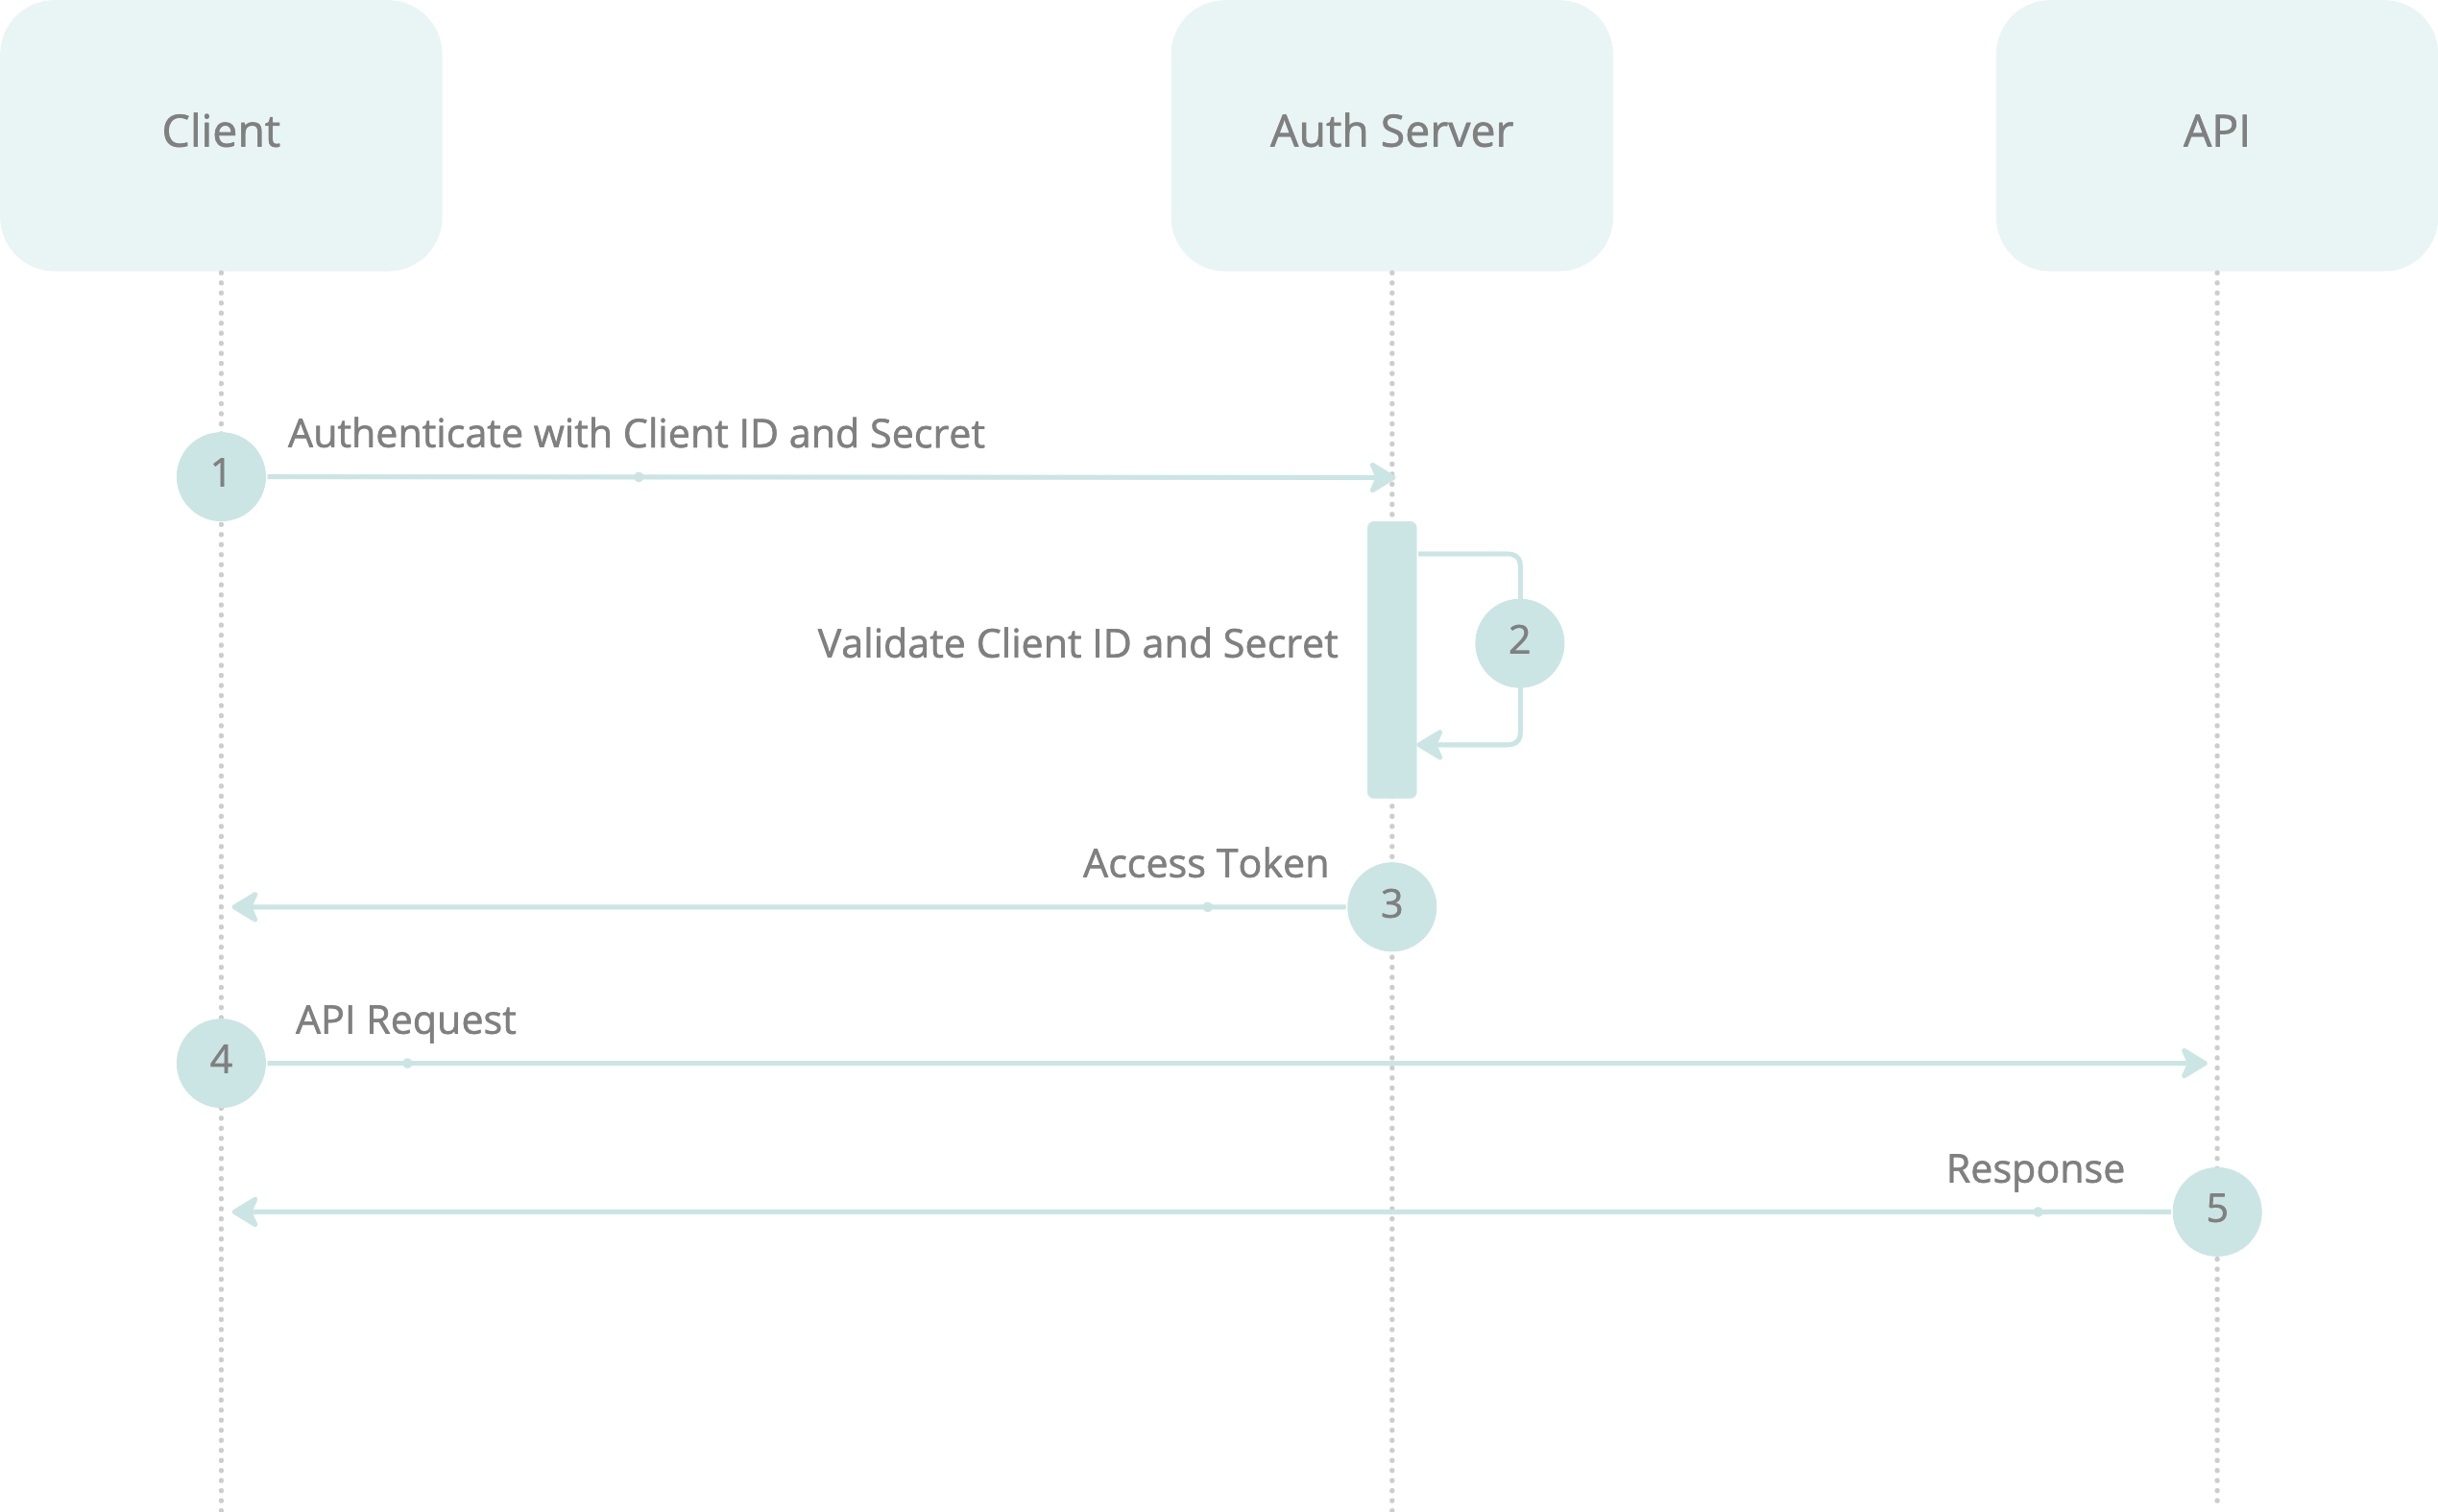
The Client Secret authentication method involves the following steps:
- Client Authentication: The client authenticates with the Authorisation Server using its client ID and secret.
- Access Token Issuance: The Authorisation Server validates the client credentials and issues an access token.
- API Access: The client uses the access token to make authorised API calls.
Exchange client credentials for access tokens
To access the UPowr API, you must request an access token. To do so, you will need to POST your client credentials to UPowr's token URL.
Example: exchange client credentials for access token
curl --request POST \
  --url 'https://id.core.upowr.cloud/oauth/token' \
  --data grant_type=client_credentials \
  --data client_id=YOUR_CLIENT_ID \
  --data client_secret=YOUR_CLIENT_SECRET \
  --data audience=AUDIENCE_PROVIDED_BY_UPOWR
Ensure to provide the following parameters in your request:
grant_type: This should be set to "client_credentials".client_id: Your application's Client ID, provided by UPowr.client_secret: Your application's Client Secret, provided by UPowr.audience: The identifier for the API you're accessing, provided by UPowr.
Note that the authorisation server endpoint is id.core.upowr.cloud.
To see an example of accessing the API using an access token, click here.
Caveats
There are some security caveats associated with using a pre-shared client secret as a credential, especially for scenarios with higher security demands:
- The secret used by the application is shared with UPowr and its authentication services provider Auth0.
- The secret is sent over the network and could be intercepted, for example, in the case of man-in-the-middle attacks.
- A client can only have a single client secret. It is not possible to rotate the secret while you update your implementation with the new secret.
To improve your security posture, we recommend using the Private Key JWT authentication method.
Private Key
Private Key JWT Authentication supports OIDC Connect Core Client Authentication 1.0 client authentication using JWT assertions signed with asymmetric key pairs.
There are some security benefits associated with using Private Key JWT:
-
The private key is not transmitted over the network, reducing the exposure risk of your application's credentials. UPowr does not know the private key, and only applications that have access to the private key can create authentication requests.
-
The signed assertions have a short expiry time, limiting the window of opportunity for replay attacks.
Create and register client credentials
When you register the public key with UPowr, you must provide the public key encoded in PEM format. You may provide this as an X.509 certificate encoded in PEM format. UPowr enforces a minimum RSA key size of 2048 bits and a maximum key size of 4096 bits. We recommend using OpenSSL to generate a 2048-bit RSA key pair.
-
Generate a private key and a public key in PEM. You should safeguard the private key and never share it, not even with Auth0:
openssl genrsa -out sample_key.pem 2048 -
Extract the public key in PEM format using the following command. This command extracts the public key details so it can be safely shared without revealing the details of the private key:
openssl rsa -in sample_key.pem -outform PEM -pubout -out sample_key.pem.pubThe example below shows the contents of the
sample_key.pem.pubPEM file:-----BEGIN PUBLIC KEY-----
MIIBIjANBgkqhkiG9w0BAQEFAAOCAQ8AMIIBCgKCAQEAxZXuIeVVOM3bFzNDqnht
X6VsnCBhrw/Q/cg6y8DmC6BfTJxvxZ8sKHmHsKmQXemiZggDpbEsOe59olromXM0
E3ORvI1AULk8DqyJbiIwLUy8nucNcF1s6WDoB1NaR7lg7s7K75rEktAxOkGjLb1C
fOqvXLUmTwqU/dTHdk1CVaWkAA5St6/Y0F/pctelehptqWdzotzSWG3PGqR2KppQ
LcmcxRoiZcg6F+F6Wh3c6IXuj9G0cB5nepCnPRCnQY5YE3IdrZgWMOC9WggNfFOo
LaCOLqlgx1cBSIkeID+ZGbDx8svh8/bEazi9GXwSU5sv7KKvA/htyA4tHVJtN1Ex
+QIDAQAB
-----END PUBLIC KEY----- -
Determine the signing algorithm you will use to sign assertions.
Algorithm Digital Signature or MAC Algorithm RS256 (default) RSASSA-PKCS1-v1_5 using SHA-256 RS384 RSASSA-PKCS1-v1_5 using SHA-384 PS256 RSASSA-PSS using SHA-256 and MGF1 with SHA-256 -
Provide the public key PEM file (i.e.
sample_key.pem.pub) and chosen signing algorithm to UPowr.
Build the assertion
-
Header
-
alg: The algorithm used to sign the assertion. The algorithm must match the algorithm specified to UPowr when the public keypair was provided, i.e. RS256, RS384, or PS256. -
kid: (optional) The UPowr generated key ID of the credential. Thekidis created when you register the client with UPowr.
-
-
Payload:
-
iss: Your application's Client ID, provided by UPowr. -
sub: Your application's Client ID, provided by UPowr. -
aud: Set tohttps://id.core.upowr.cloud/ -
iat(optional) andexp: Issued At and Expiration claims set to the correct timestamps. The client assertion is a one-time use token, and we recommend the shortest possible expiry time. -
jti: A unique claim ID created by the client. We recommend using the Universally Unique Identifier (UUID) format.
-
The token must then be signed with the private key you provided UPowr.
Assertion limits
JWT assertions should have a reasonable expiration time (exp) to mitigate the risk of token replay attacks. As such, we support a maximum of 5 minutes for the lifetime of a JWT assertion.
We recommend setting a maximum of 1 minute.
The maximum length of the JWT assertion is 2048 bytes.
Claims within the assertion have the following limits:
iss: 64 characterssub: 64 charactersjti: 64 charactersalg: 16 characters
Example
In the example below, the Node.js script uses a jose package to generate the assertion:
const { SignJWT } = require('jose')
const crypto = require("crypto");
const uuid = require("uuid");

async function main() {
 const privateKeyPEM = crypto.createPrivateKey(/**
   Read the content of your private key here. We recommend storing your private key
   in a secure key store.
 */);

 const jwt = await new SignJWT({})
   .setProtectedHeader({
      alg: 'RS256', // or RS384 or PS256
      kid: '(OPTIONAL) KID_GENERATED_BY_UPOWR'
   })
   .setIssuedAt()
   .setIssuer('CLIENT_ID')
   .setSubject('CLIENT_ID')
   .setAudience('https://id.core.upowr.cloud/')
   .setExpirationTime('1m')
   .setJti(uuid.v4())
   .sign(privateKeyPEM);
  console.log(jwt)
}

main();
Exchange assertion for access tokens
To authenticate, send the JWT in a request to the token URL. The request should include the JWT as a bearer token in the authorization header or request body, depending on the specific requirements of our API.
Example: exchanging assertion for access token
curl --request POST \
  --url 'https://id.core.upowr.cloud/oauth/token' \
  --header 'Content-Type: application/x-www-form-urlencoded' \
  --data-urlencode 'grant_type=client_credentials' \
  --data-urlencode 'client_assertion_type=urn:ietf:params:oauth:client-assertion-type:jwt-bearer' \
  --data-urlencode 'client_assertion=CLIENT_ASSERTION_OBTAINED_IN_PREVIOUS_STEP' \
  --data-urlencode 'audience=AUDIENCE_PROVIDED_BY_UPOWR'
Upon successful authentication, our server will validate the JWT using the public key and issue an access token. This token can then be used to make authorised API calls.
To see an example of accessing the API using an access token, click here.
Accessing the API
A successful authentication request to the token URL will return a standard OAuth 2.0 Access Token Response.
In UPowr's case, you can expect to receive an HTTP 200 response with an access_token, scope, token_type, and expires_in i.e.:
{
  "access_token": "eyJz93a...k4laUWw",
  "scope": "quote:accept quote:file:update project:install-preferences:update project:contract:accept query",
  "token_type": "Bearer",
  "expires_in": 86400
}
With a valid access token, your application can access the UPowr API by including the token in the Authorization header.
The access token expiry period is typically 10 hours. However, expires_in should always be used as the definitive value.
Example: API call using access token
curl --request GET \
  --url https://API_ROUTE \
  --header 'authorization: Bearer ACCESS_TOKEN' \
  --header 'content-type: application/json'
Example: end-to-end Private JWT in Node.js
- Save the below sample Node.js code
- Update
JWT_PRIVATE_KEY,JWT_CLIENT_ID,API_AUDIENCE, andAPI_URL - Install dependencies:
npm install jose uuid - Run the file
const { SignJWT } = require('jose');
const crypto = require('crypto');
const uuid = require('uuid');
const fs = require('fs');

// The private key used to sign the JWT assertion
const JWT_PRIVATE_KEY = fs.readFileSync('PATH_TO_PRIVATE_KEY', 'utf-8');
// The client ID used in the JWT assertion, provided by UPowr
const JWT_CLIENT_ID = 'OBTAIN_FROM_UPOWR';
// The audience for the access token, provided by UPowr
const API_AUDIENCE = 'OBTAIN_FROM_UPOWR';
// UPowr API Query URL, provided by UPowr
const API_URL = 'OBTAIN_FROM_UPOWR';
// The audience in the JWT assertion. Leave as is.
const JWT_AUDIENCE = 'https://id.core.upowr.cloud/';
// Token URL to exchange the JWT for an access token
const ACCESS_TOKEN_URL = 'https://id.core.upowr.cloud/oauth/token';
// The query to execute on the API
const API_QUERY = `query {
  customers(first: 10) {
    id
  }
}`;

async function createJwtAssertion() {
  // Read the private key from file and create a private key object
  const privateKeyPEM = crypto.createPrivateKey(PRIVATE_KEY);
  // Create a new JWT and set its properties
  const jwt = await new SignJWT({})
    .setProtectedHeader({ alg: 'RS256' })
    .setIssuedAt()
    .setIssuer(JWT_CLIENT_ID)
    .setSubject(JWT_CLIENT_ID)
    .setAudience(JWT_AUDIENCE)
    .setExpirationTime('1m')
    .setJti(uuid.v4())
    .sign(privateKeyPEM);

  return jwt;
}

// Exchanges a JWT for an access token by making a POST request to the `ACCESS_TOKEN_URL`.
async function accessToken() {
  console.log('Fetching new access token')

  // Create the JWT assertion
  const jwtAssertion = await createJwtAssertion();

  const response = await fetch(ACCESS_TOKEN_URL, {
    method: 'POST',
    headers: {
      'Content-Type': 'application/json'
    },
    body: JSON.stringify({
      grant_type: 'client_credentials',
      client_assertion_type: 'urn:ietf:params:oauth:client-assertion-type:jwt-bearer',
      client_assertion: jwtAssertion,
      audience: API_AUDIENCE
    })
  });

  if (!response.ok) {
    console.error('Error fetching data from token URL', await response.text())
    return process.exit(1)
  }

  const { access_token, expires_in } = await response.json();

  // NOTE: access tokens should be cached and re-used until expiry
  console.log(`Access token expires in ${expires_in} seconds`);

  return access_token;
}

// Main function
async function main() {

  // Create the JWT assertion and exchange it for an access token
  // Access tokens should be cached and reused until they expire
  const token = await accessToken();

  // Query the API using the access token and the query
  const response = await fetch(API_URL, {
    method: 'POST',
    body: JSON.stringify({ query: API_QUERY }),
    headers: {
      'Content-Type': 'application/json',
      Authorization: `Bearer ${token}`
    }
  });

  if (!response.ok) {
    console.error('Error fetching data from the API', await response.text())
    return process.exit(1)
  }

  // Extract the data from the response
  const { data } = await response.json();

  // Log the number of records received from the API
  console.log(`API returned:`, data);
}

main();